Leica Geosystems has built-in document scanning and calibration functions since the launch of the P series 3D laser scanner. It can solve the problem that the scanner's own accuracy is reduced due to the temperature, air pressure and bumps that occur during storage, transportation and use. The function of returning the instrument to the factory state accuracy also adds to the reliability of the user's scanned data Guarantee.
Q1: What calibration does the scanner need to do? When is calibration done?
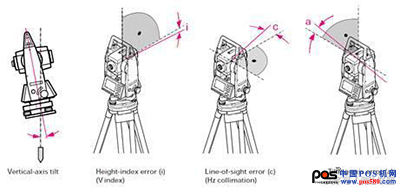
A1: The scanner's own L, T compensation accuracy, i, c, a angular accuracy, laser collimation offset error accuracy, and distance accuracy can be checked

Common Q & A of 3D laser scanner onboard inspection and calibration function
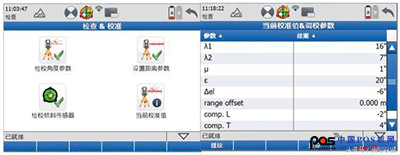
The errors of various indicators of the calibration are explained as follows:
λ1, λ2: laser collimation deviation, the correction number of laser in different directions
μ: Collimated axis error, equivalent to the correction number of c angle of the total station
ε: horizontal axis error, equivalent to the total angle correction of the total station
Δel: The difference of vertical plate index, which is equivalent to the correction number of i angle of the total station
Range offset: distance plus constant correction number
Comp. L: Correction number of zero compensation in L direction
Comp. T: Zero correction number in the T direction

Common Q & A of 3D laser scanner onboard inspection and calibration function
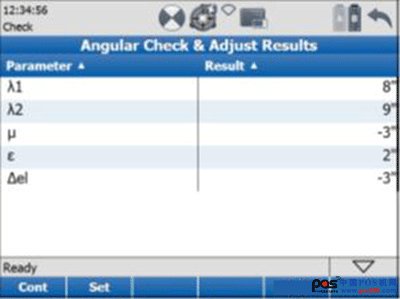
In the above results, the numerical value represents the correction number of the error zero, but does not represent the accuracy of the instrument itself. A large value does not mean that the instrument has poor accuracy. After 2-3 calibrations, if the value remains stable, for example, the first measurement of ε results in 20 ″, the second measurement is 19 ″, and the third measurement is 20 ″, the change is within the normal range, It means that the accuracy of the scanner is appropriate. Conversely, if the results of each measurement are relatively large in three measurements and the measurement environment (temperature, humidity, direct sunlight, etc.) is very stable, the instrument may have accuracy Problem, you need to contact the Leica after-sales service center to test and check the instrument again.
Q2: What are the requirements for the selection of calibration site and the layout of targets?
A2:
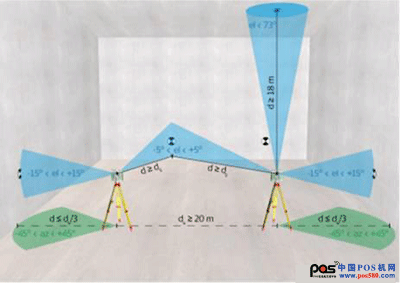
1. At least 5 targets are required, and the distance of all targets in the calibration field must be at least greater than 2.5m;
2. Two short-range targets, which are located on both sides of the scanner at two stations, and in the vicinity of each station, a short-range target at a height that is approximately horizontal to the scanner:
The target distance must be greater than 2.5m and less than 1/3 of the horizontal distance of 2 stations
The horizontal angle between the center of the target and the center of the scanner is less than + -15 °
The horizontal angle between the scanner to the target and the scanner to another station should be in the range of 135 ° -225 °
3. Two long-range targets, the distance from the two stations of the scanner must be greater than the distance between the two stations of the scanner, the angle between the scan and the target and the horizontal plane is less than 5 °
4. One target at a height, the vertical distance from one of the scanners is greater than 18 meters, and the scan moves to the target and the angle between the target and the horizontal plane is greater than 73 °
5. The distance between the two stations is greater than 20 meters
6. At least 5 targets, preferably 6-8
Regarding the layout of the inspection school, as shown below:

Q3: What should be paid attention to during the inspection?
A3:
1. The length of one inspection is about 1-2 hours. During the inspection, try to choose a period of relatively stable temperature and humidity changes during the day, for example, early morning or evening; according to existing experience, check during cloudy or light rain The results of the school are better than sunny days and when the sun is full
2. Before calibration, let the instrument stand in the calibration environment for more than 15 minutes to allow the instrument to adapt to the ambient temperature
3. Avoid direct sunlight during the calibration process, or illuminate the instrument through the glass reflection of the adjacent building, otherwise it will have a bad influence on the results of the calibration
4. When checking the school, avoid driving by a car and a large number of people walking around. Try to choose a relatively quiet place for the school

Common Q & A of 3D laser scanner onboard inspection and calibration function
After the calibration procedure, the scanner will automatically calculate a new set of calibration results, and only after the operator clicks "Settings" will the new calibration results be saved on the instrument, otherwise, the instrument will continue to use the calibration The previous value is used as the offset value.
plastic refrigerator storage box with lid Fresh-keeping box
*Lid is easy to remove and replace
*Large mouth with tight-fitting cover for smooth pouring*Keeps contents fresh and secure, BPA free, food-safe and hygienic,freezer safe, dishwasher safe.
* Airtight, water proof, leak proof, durable construction.
*Suitable for kitchen staples like flour, sugar, rice, nuts, beans, snack, food,cereal, coffee, tea or dry pet food.
*Multi-size : Other campacity also avaliable
*Support combine set freely
Kitchen Storage Series,Plastic Refrigerator Crisper,Food Storage Container,Fridge Organizer Bins
SY INTERNATIONAL (CN) CO.,LTD , https://www.syplasticbox.com